

How to Enable AssistiveTouch in iOS 13 and iPadOS 13
AssistiveTouch is probably the biggest highlight of the Accessibility suite. Though it'due south designed for the people who have difficulty touching the screen or require an adaptive accompaniment, anyone can have reward of it to carry out several tasks more conveniently. Sadly, despite being such a notable characteristic, it remains largely unexplored. Wouldn't it be peachy if you could capture the screen of your iPhone or iPad or access all of your Accessibility features similar Zoom, Smart Invert, or VoiceOver with a single tap? Yeah, information technology would not only exist more convenient but also salvage you time. And, this is just the tip of the iceberg as you tin perform several tasks faster. In this hands-on guide, we are going to show y'all how you tin enable and employ AssistiveTouch in iOS 13 and iPadOS 13.
Enable AssistiveTouch in iOS xiii and iPadOS thirteen
With iOS 13, Apple has slightly tweaked the location of Accessibility and many of its sub-features. For a change, Accessibility has now found a permanent spot on the main Settings screen, which is a good move considering how significant it is. As for AssistiveTouch, it has now been included under a new department. Due to the relocation, many users might wonder where this feature has gone. So, let's first run into how y'all can enable AssistiveTouch and and so we will get into its usage.
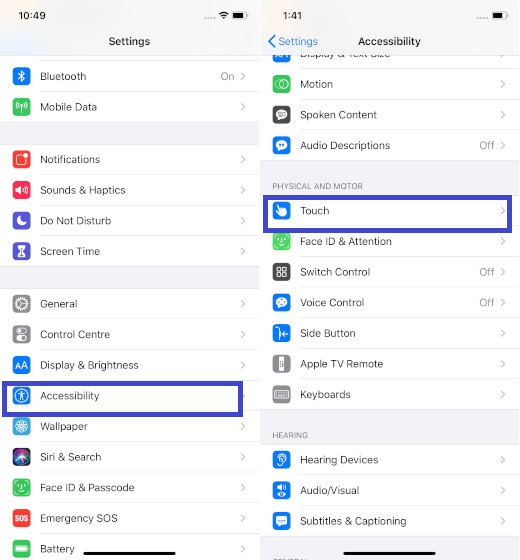
1. Open the Settings app on your iPhone or iPad.
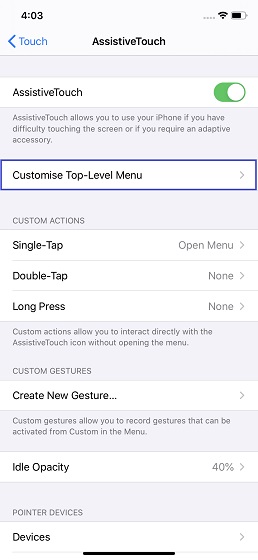
2. Now, tap on Accessibility and select the Touch option located under the Physical AND MOTOR department.
3. Next, tap on AssistiveTouch and and then turn on the switch to enable it.
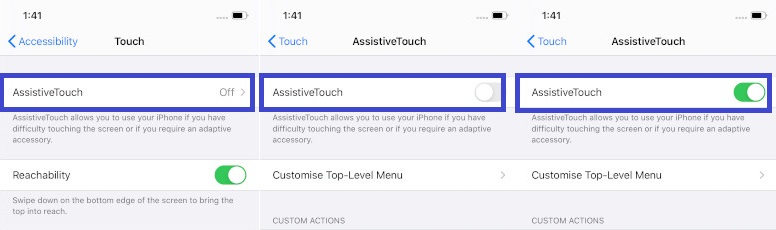
Now, a small grayness AssistiveTouch button volition appear on the screen. Y'all can tap on it to access many options like rotating screen, accessing Notification/Control Center, adjusting volume and more.
After, if you decide to plough off AssistiveTouch on your device, simply render to this same setting and disable the toggle.
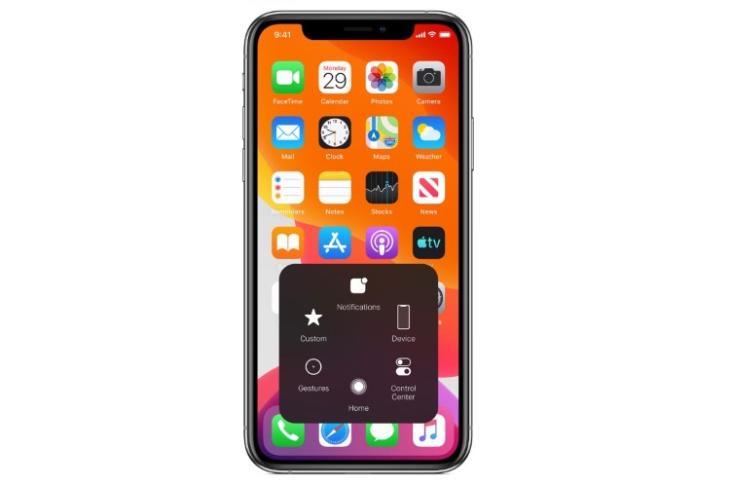
Customize Top Level Menu Shown in AssistiveTouch
Depending on your needs, you tin can customize the top-level menu in the AssistiveTouch to hands access the frequently used features like App Switcher, SOS, Reachability, and more.
1. Follow the steps from 1 to three in a higher place and and so tap on the Customize Top-Level Menu pick.
2. Now, tap on an icon that y'all want to alter so cull the preferred choice. In the end, brand sure to tap on Washed at the top right to confirm.
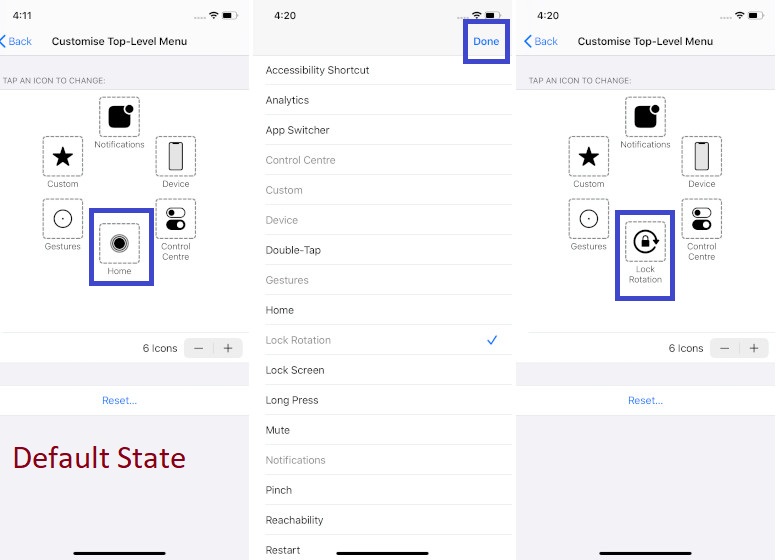
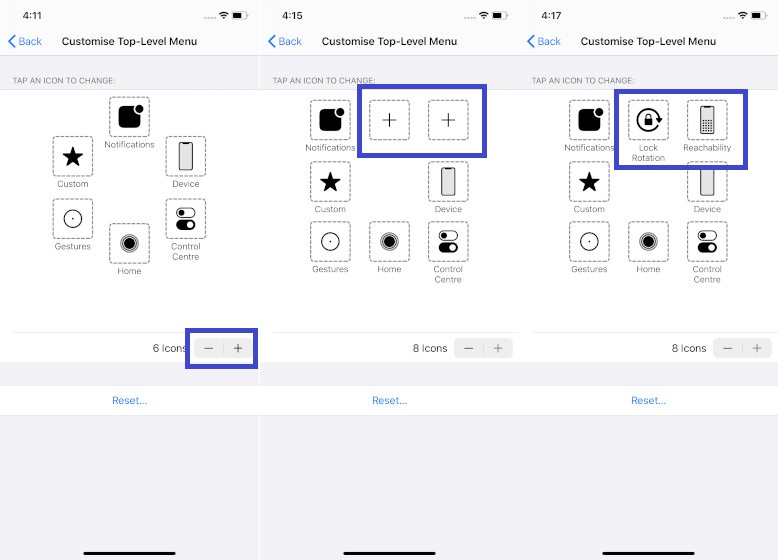
By default, the menu shows six options similar Home, Notifications, Device, Control Center, Gestures, and Custom. Just you tin can increase or decrease the number of items yous want on the bill of fare.
To increase an item: Tap on the "+" button > tap on the empty box > choose the desired choice > tap on Done.
Reset AssistiveTouch Card: If you ever find the AssistiveTouch menu messed upwardly, simply tap on the Reset button to put it to the default land.

Cusotmize Custom Actions and Gestures to Get the Most Out of AssistiveTouch
One of the best things most AssistiveTouch is that you tin can fine-tune custom-actions and gestures to deport out the oftentimes-repeated tasks a lot faster. Here is how you lot can practice that;
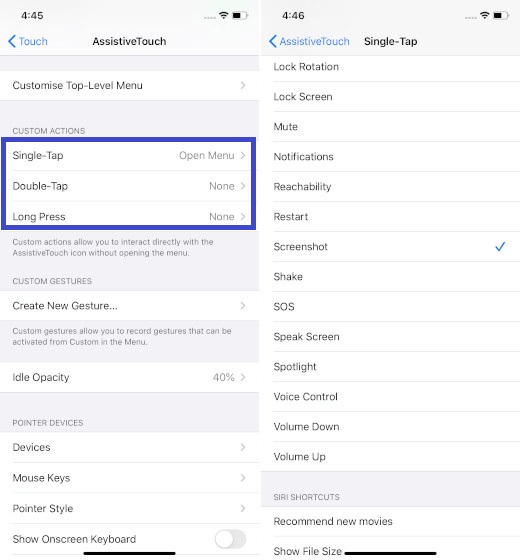
Make use of Taps and Long Press Actions
If y'all detect the process of restarting the device a chip inconvenient, you can assign a single-tap activeness for restart or even choose to snap a screen with just a tap. And then, use the custom-actions to interact with the AssistiveTouch icon without having to open up the menu. Similarly, you can assign actions for "Double-Tap" and "Long Printing".
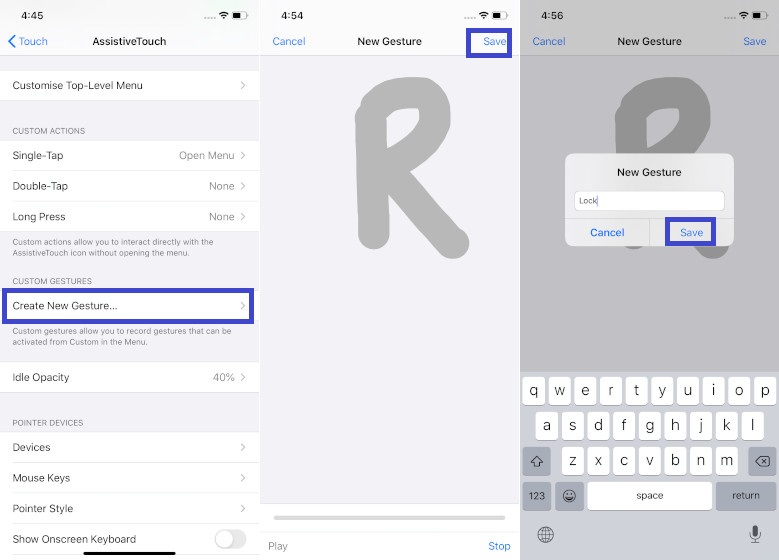
Create Custom Gestures
Gestures are not bad as they come in super handy for carrying out tasks more comfortably. So, if you have a liking for them, create new gestures which you tin can actuate from the AssistiveTouch menu. Simply tap on Create New Gesture and then tap or swipe on the screen to create a custom gesture. Once you are satisfied with your gesture, brand sure to tap on Salve at the top correct and give information technology a suitable proper name.
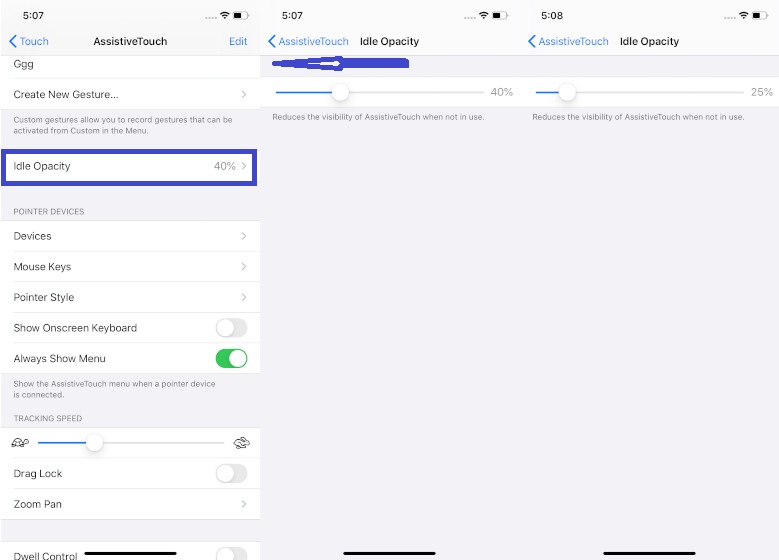
Adjust Idle Opacity of AssistiveTouch Icon
Don't want the AssistiveTouch icon to distract your attention when non in use? Well, you lot tin reduce its visibility so that information technology tin stay out of sight. Just tap on the Idle Opacity option and then elevate the slider towards the left to reduce the opacity.
SEE ALSO: How to Set Up Parental Control on Mac in macOS Catalina
Go the Most Out of AssistiveTouch on iPhone and iPad…
And so, that'southward an easy fashion to enable AssistiveTouch in iOS 13 and iPadOS 13. I have e'er loved using this feature for many reasons. For i, information technology allows me to carry out many tasks like immigration RAM of iPhone or accessing all of my favorite Accessibility features such as color filters, classic invert and more quickly. What's the one thing you like about about information technology? Let me know that in the comments below.

Source: https://beebom.com/enable-assistivetouch-ios-13-ipados-13/
Posted by: reuterwroke1951.blogspot.com
0 Response to "How to Enable AssistiveTouch in iOS 13 and iPadOS 13"
Post a Comment